Thursday, January 26, 2017

Oldies but Goodies!

I have recently been rebuked, by several people, for coming back from a long hiatus (in the fall), and then jumping right back into the hiatus! So, here I am - again!

I've spent time recently, cleaning out files on my computer, and in doing so, came across pictures of dresses I had made back when my business was new.  Most, if not all, of these dresses could be considered non-traditional wedding dresses - which I seem to get a lot of. When a bride can'f find what she wants in the Bridal Shops, she comes to me!  Thought I would bring them back, just for nostalgia's sake (is that a word?). Enjoy!

First up is a fun beach wedding ensemble - not a traditional wedding dress, but a sarong with bustier! I made smaller sarongs for her 2 young daughters as well! So fun!


Another non-traditional wedding dress; this pretty in pink dress was for a lovely lady, going into her marriage with a very specific idea of what she wanted, and also what she didn't want. Pink was her signature color, and she certainly looked lovely in it!


This pretty ivory and lace tea-length dress was for a beach wedding, as well. She wanted a 2-piece dress that she could remove the more modest over dress, and wear just the chemise for the reception.


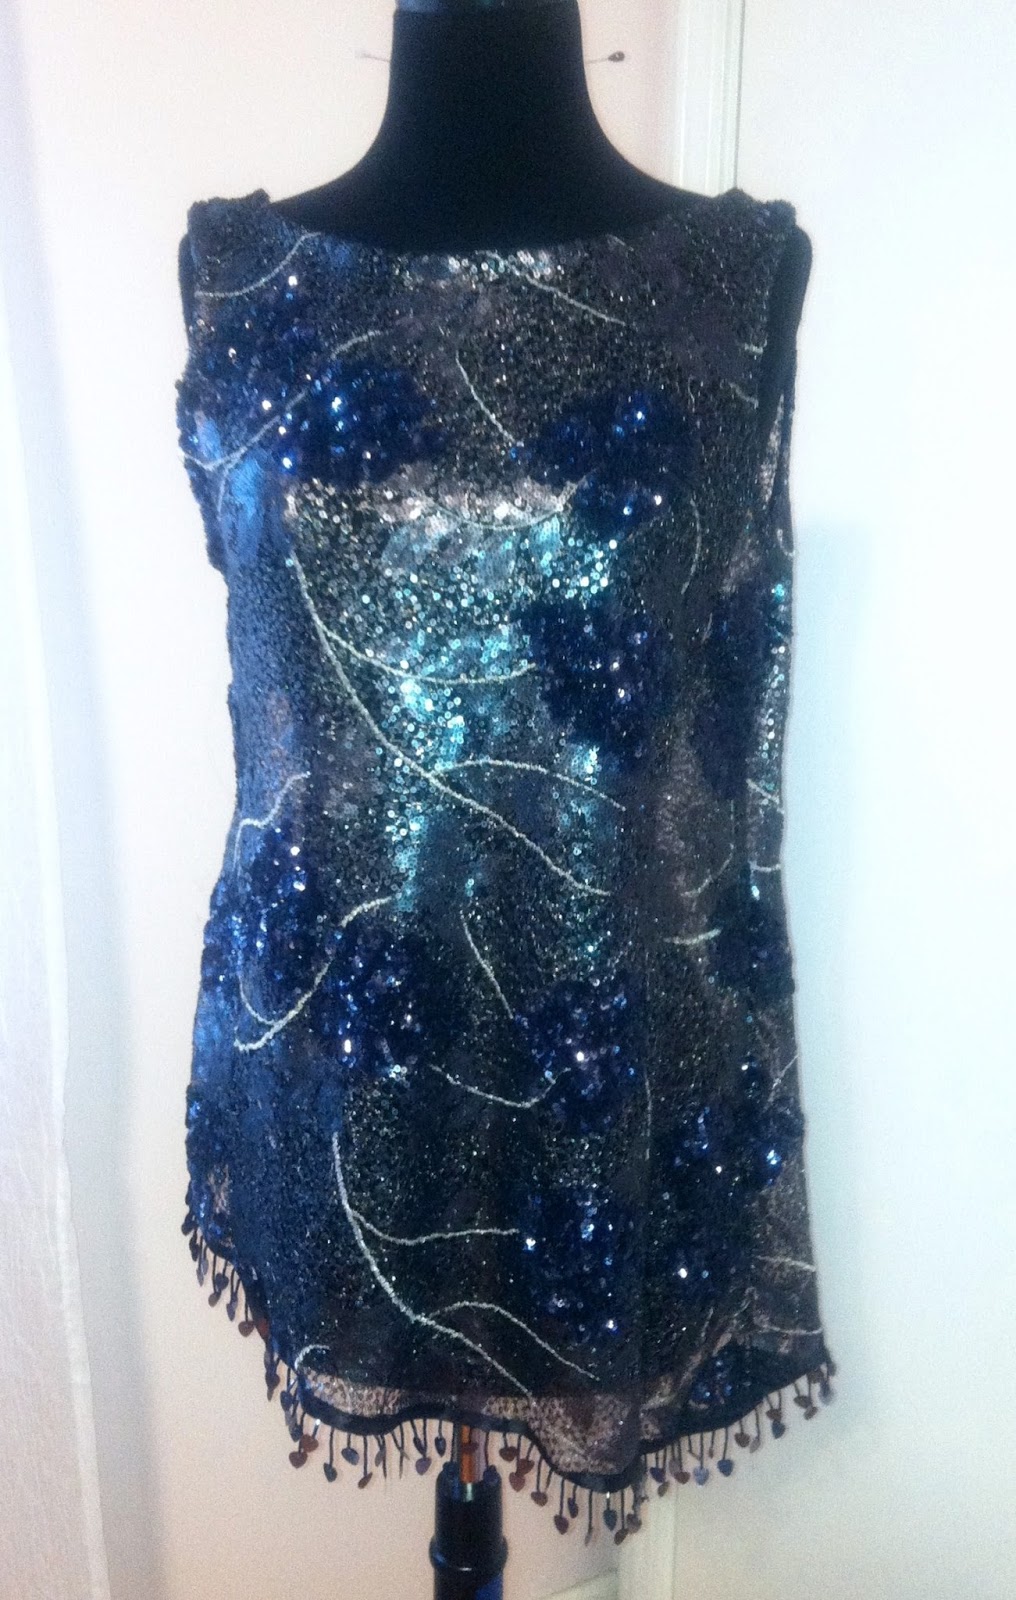
I actually got an order for this dress on line. It is a copy of a dress I had originally made for a Bridal Fashion Show. She wanted a couple of slight changes - color, size and beading embellishments. I never actually met her - she sent me her measurements (taken by a professional, per my request!), and I sent it to her when it was finished. She told me it fit perfectly!


This was the first wedding dress I made when I began my business, 10 years ago. One of my first voyages into creating my own pattern! Another bride that knew exactly what she wanted. Low-waisted, tea length, with wide sash at low waist.  Unfortunately, I can't get it to rotate! 

Monday, October 17, 2016

Hiatus Over!

I don't even want to think about how long it has been since I last posted.  I do know that the last couple years have been incredibly busy and fruitful. Many brides have walked through my door, as well as their mothers and bridesmaids.

I have also begun doing contract alterations work for a well known local bridal shop. They keep me very very busy! 

It would be almost impossible to list and show all the lovely dresses I have been privileged to create in the past months; so I thought I would just show a quick slide show of my favorites!

Hope you enjoy looking as much as I enjoyed the creating!


This was a "Pretty in Pink" gown for a bride that had brought me a picture of a gown completely different form what we actually created. The only thing that really stayed the same from her original idea, was the color pink! 


Some brides want lots of color!  This bride did not want anything traditional! Red and black were her colors!  Its actually a short red and black lace short sheath, with a removable over skirt of cascading ruffles. The short sheath was necessary for her departure ride - on a motorcycle!  I put invisible zippers at the bottom of the side seams, that she could unzip for more freedom of movement.

A very good friend asked me to make her a beaded tunic for a special occasion. Simple construction, but it turned out so beautiful! The asymmetrical hem is trimmed in a beaded fringe.


This was a purchased gown that had a very long train, which I cut off, and created this pretty back drape with cap sleeves, to cover the open back.

This sweet young lady needed a flower girl dress for the wedding she was attending. She was such a joy to work with!  When she put on the finished dress, she teared up and said, "I am beautiful!"


In the first picture, here, you see a cathedral length gown that was worn several years ago by the bride, who brought it in to me ans asked that I take it apart and create 2 small flower girl dresses for her daughters, aged 18 months and 3 years. 


Okay - so this is certainly not everything I have worked on in since I last posted, but it will give you, dear readers, a small taste of what I have been up to! 

Next up - my recent fav's - both created and altered!

Saturday, August 31, 2013

Beautiful Brocade

As I have mentioned at least a couple times in previous posts, Mother of the Bride/Groom dresses are almost impossible to find. That is unless you want to look like one of the bridesmaids, or the grandmother. Which is not a bad thing, just not necessarily what most fashionable mothers want to look like!

Because of this glut (is that a word??) in bridal wear marketing, I have been finding myself working with more and more mothers to create their attire for this special event. This week I have been working on just such a project. It is quickly becoming one of my more pleasurable creations, for several reasons! 1) the fabric is so lovely! It is a gorgeous green and blue turquoise paisley with silver and gold accenting. Though it ravels terribly, it is so pretty that I don't really mind the extra work!  2) The pattern, though not difficult, is not your usual slap together the matching seams kind of pattern. I am actually needing to read the pattern directions! Can't tell you how long it's been since I've had to do that! It's just enough of a challenge to keep it interesting. 3) The lovely lady I am creating the dress for is fun and entertaining, with definite ideas of what she wants, interesting stories and a sense of humor.

Yesterday I spent several hours cutting the fabric out; it shouldn't have taken so long, but I found myself about 6 inches short of what I needed, and it was a bit of a challenge to rearrange, adjust and re-align the pattern pieces to all fit. After our first fitting, this afternoon, I got busy sewing.

The pattern is a Retro Butterick:
http://butterick.mccall.com/b4919-products-5273.php?page_id=371

Today I was able to finish the bodice:
                                                                      Bodice Front

Bodice Back
(minus the zipper!)
 
The front needed a little tweaking (added side darts and reduced some of the volume across the front). Tomorrow I will attach the skirt and the zipper; then will wait til our next fitting to measure for the hem.
 
The skirt panel are ready to be sewn together and sewn to the bodice. One of the most enjoyable parts to my sewing today was finishing the skirt seams! I used a green turquoise silk shantung for both the bodice lining and the Hong Kong seam finish.
 
 
I do love a pretty Hong Kong finish!!

Friday, August 9, 2013

Too Short Wedding Gown

Today's project: adding length to a too short wedding gown.

Not as difficult as it might sound - at least with this gown. It has a 1.5" wide ruffled organza trim at the hemline; so we decided to just add another layer of the ruffled organza. The gown is about 1.5" too short, so after some careful measuring, I figured out I needed to cut 14 yards of 3.5" wide strips of ivory organza. To make the whole process easier, I decided to cut the 14 yards in 1 yard increments, gather them individually, and then sew the ends together. But before I could gather them, one long edge had to be very slightly frayed, to match the existing hemline. Several hours later . . . .

After ruffling each strip, I gathered then pressed each piece -
 
Tomorrow I will sew the ends of all these strips together, then attach them at the hem. Here, you can see both the original length, and how the new ruffle will add just the right amount!
 
 
And here, you can see how pretty the new hem will look when completed. Ignore those pesky threads - they will magically disappear when it's finished!
 
 
Such a lovely gown! Can't wait for the bride to see the finished project!


Monday, August 5, 2013

An Un-Recognizable Vintage Re-Make

 
When Jessica brought me her mother's 1970 something vintage wedding gown, and told me what she wanted to do with it, part of me was appalled! But, another part of me was very intrigued!
This gown was one of those very dated wedding gowns - lots of wide lace at the high neck, big sleeves, you catch my drift, right?


The fabric had aged to a wonderful candlelight pantina - just beautiful! I was in love with the lace at the neckline, cuffs and hem. Absolutley gorgeous!
 
 
But it was hardly a modern girls dream dress. Jessica had actually already purchased her wedding gown, and wanted this vintage gown of her mothers' made into her rehearsal dinner dress. She wanted to use the lace and the original fabric to create a completley new dress.
So....
I removed the bodice lace. Removed the sleeves. Removed the skirt. Basically took it apart and started from scratch. Re-made the bodice into a strapless; cut and re-shaped the skirt into a fitted mini; added that gorgeous lace around the bodice neckline. We decided it needed thin straps for support, as well as the additional foundation I added (it amazes me that these vintage gowns have NO foundation , let alone a lining to most of them!). Some tweaking here, some adjustment there, and
 YA-LAW!!!
 
 
Amost completley un-recognizable! Jessica is a very tiny girl, so the final dress does not fit on my dress form, and I didn't think to get a final photo of it on her :(
 
The lace is still gorgeous, the fabric is still that lovely candlelight color. But the dress is so completley different! Just goes to show what you can do with a little creativity!


Tuesday, July 30, 2013

Mother of the Bride Frustrations

I have this discussion all the time -

"Where do you shop for Mother of the Bride dresses, that don't look like bridesmaid dresses or grandmother dresses?"

Shopping for your MOB dress can be one of the most disheartening parts of the whole wedding planning. There just are not a lot of choices out there that don't look like a bridesmaid dress, show a little too much skin, are too 'poofy', too 'strapless' or bare, too short, too embellished, too 'suit-y", or just plain ugly.

Well, dear MOB's - fear not! You may or may not have thought of the idea that a custom made dress is not just a luxury of a by-gone-era, but a very real modern day convenience.
 There is a vast assortment of patterns out there that are more than suitable for MOB dresses. And the fabrics we have at our disposal today are unimaginable! You have your traditional silks and satins, of course, as well as the ever popular chiffon. But then there are your textured silks, brocades, printed and embellished chiffons, hammered satins, crepes, even some lovely linens,  and knits, including silk jersey, and of course an unlimited supply of gorgeous laces, in all colors of the rainbow, with sequins, or beading, or simply - lace.

I have been saving MOB patterns in my Pinterest board - here-
http://pinterest.com/candilouise/mob-patterns

These are just a very few - not really even touching the surface - of what is available. For more pattern idea's you can go  to http://voguepatterns.mccall.com/, or here: http://www.simplicity.com/ or here: http://www.marfy.it/?sl=EN
http://www.mccall.com/home.html ; or here:  http://www.simplicity.com/


These are just a few starting points. There are also patterns and ideas available on http://etsy.com
If your tastes run more towards vintage styles, you can find many great patterns here: http://evadress.com

With any of these patterns, it is usually not at all difficult to lengthen a short dress in to a long one, to add decorative embellishment where it is most needed, or change simple design details.

A dresses' beauty is found in the style lines, the flow of the fabric, and the fabric itself, but also in how the wearer feels in it. Don't settle for unsatisfactory dresses when you really don't have to!

Tuesday, July 23, 2013

Dear Bride: Why Yes! I Can!

"My dress is WAY too long, but it has a deep lace hem! Can you fix it?"
 
"I have a dress I love but it's about 5" too short! Can you fix it?"
 
"I found a dress really cheap- but it's about 5 sizes too big- can you make it fit me?"
 
"My dream dress is gorgeous! But it's a couple sizes too small. Can you help?"
 
The good news is - in most; not all, but most; cases, the answer is yes.
 
Deep lace hem?
 
 This deep lace hem was about 6 inches long. After measuring exactly how much it needed to be brought up, and pinning the extra length above the top row a lace -

 
 I carefully trimmed away and separated the bottom segment of lace and hem from the upper part of the skirt, cutting just above the top row of lace.
 
 
 This is the hardest part - re-pinning the lace that I removed, to the correct and level length. Not as easy as it looks. Then it is hand basted on before being machine stitched. If there is beading, it is usually all hand stitched.
 
 
 This is a gown that came in several sizes too small. I added a lace-up panel at the back, that the bride loved even more than the original zipper!
 
 
Here is a case of a dress that came in way too short! About 12 inches to be exact! Fortunately, I was able to get my hands on a sample dress with the same lace. After re-making the satin, crinoline and lining layers to the new length, I trimmed away the bottom 'trim' layer of the lace. I then very carefully removed about 15 inches from the bottom of the sample dress, and positioned in in place on the dress.
 
 
You can see the pins here, if you look closely! Hand basted, very carefully, to make sure it was all even and at the correct length; then machine stitched in place.
A challenge, to be sure- but can I tell you a secret? Shhhhh!!!
(The bride never knew! It was obvious when the dress arrived from the manufacturer, that it was much too short. In looking at her measurements, it was not difficult to figure how much length was needed, so I added it before she even saw it!)
 
There are many other alterations that can be performed on your wedding dress- including adding straps or even sleeves, adding or removing a petticoat, adding beading or other embellishments, and of course, my favorite - bustling! But that's another post!